


We ran this story for the first time in March. Blair has now sent in the subsequent parts leading up to the completion of his project. I thought it would be better to re-post this now so that all the stories would be in sequence, stay tuned over this week. Part I:
Blair Turner from Dorset, England, writes in with Part I of his story of the making of a Cinelli SC Leggerissimo (information about this very particular model can be found here).
"Finding a Cinelli frame for renovation over here in the UK is difficult. I put this down to the fact that during the 1950/60 and 70’s most riders stuck with local frame builders and regarded foreign imports with contempt and whatever Cinelli frames there are over here are now in cherished collections. Certainly on this first point the reverse is true – you will not find many English frames from these eras in Italy – make of it what you will.
I therefore decided to commission a replica build. Now, this maybe a contentious issue with Cinelli purists but I stress it is a replica, and if there are not enough frames for those interested to own one then I am not adding to the demand (I have heard of and met two guys who had 20 Cinelli’s each in their collections).
I was very impressed by the whole ethos and exclusivity of the Leggerissimo model - built of a thin gauge tubing and no chroming it’s style certainly struck a chord.
A fellow classic bike enthusiast and frame builder (who wishes to remain anonymous) agreed to do the work . The basis for the build was to be the recently re-released Columbus SL tube set (albeit in a different alloy to Cyclex and certainly lighter than it’s predecessor). Note that the seat stays supplied with this new tube set are double tapered and therefore not suitable for use in the construction of the typical “fast back” seat stay arrangement. I had to substitute a set of single taper 12mm diameter stays in their place. The long point sheet lugs, brake bridge and gussets were sourced from Richard Sachs in America . The fork crown, tangs, a head badge, drop outs, etc were all sourced over a period of months from E-bay and other contacts. Over this period of time I also sourced as many pictures as I could find to help with the build.
Since the frame was to be bespoke I opted for a 57cm seat tube length and 55.5cm top tube – unlike the “square” frames made by Cinelli. Reading an article by Chris Kvale and John Corbett – "A Fresh Look at Steering Geometry" (2006) gave me the insight I needed to finally base the frame design around a slightly shorter wheel base Super Corsa model, adjusting the geometry to that similar of a Masi Prestige.
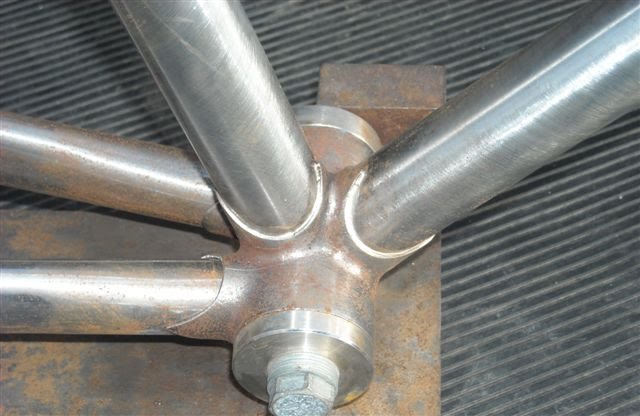
Rather than run through a highly detailed narrative of the build, I attach a series of pictures that illustrate the various stages of the frames progression with accompanying notes.
note: photos above are in order from 1 to 12, top to bottom
Pictures 1 and 2 , 4 and 5 below show the finished long point sheet lugs after drilling out and much modification/repair work aided by the use of a TIG welder.
Picture 3 shows the lightened bottom bracket drilled out in the specific pattern as described by other owners.
Once a full size drawing of the frame was completed by an architect friend of the builders and it was shown that the geometry was correct ie, all the tubes of the desired length met and remained at their desired angles, we were in a position to start the main triangle and fork fabrication . The frame was to be pinned then silver brazed , this method of construction requires less heating of the tubes thereby keeping much of their tensile strength (except for the seat lug which was bronze brazed - I will explain why later). The fork was put together first – see picture 6. It is interesting to note that the fork crown does have a front and back face, see the difference in the radii between the two faces, the front face also has a higher “skirt” to allow tyre clearance when compared to the back being lower. A minor problem was encountered prior to fabrication which required a little cold reworking of the fork blade . The fork tube cross section had a different elliptical cross section when compared to its “male” counterpart on the fork crown. Evidently Columbus fork blades were at one time flatter than they are now.
Pictures 7,8,9 ,10 and 11 show the front triangle in various stages of construction together with picture 11 illustrating the bronze brazing. All tubes were sawn and the mitres filed to suit – not cut on a lathe. It was tremendously satisfying to give the tubes a flick, they didn’t just ring back, the whole thing just seemed to sing back – you don’t get that with carbon fibre!
Anyway the next bit was the fabrication of the rear end with the “fast back” seat stay arrangement. I must take absolutely no credit for working out how to complete the rear triangle construction. Here is the problem: if the seat stays are to be silver brazed to the seat lug assembly –seat/top tubes and seat lug, (which is it self silver brazed together) there is a strong possibility that the reheating (when attaching the seat stays) may result in loss of silver braze (and therefore potential structural weakness) to the finished frame in the seat/top tube area . This was why the seat lug was brass brazed (brass having a higher melting point would not be therefore affected when the seat lug assembly was re-heated to attach the seat stays). There was of course a down side to this method of brass first, then silver braising second construction, that being, since the seat lug and seat tube were relatively thin walled there would be a strong possibility of heat distortion occurring. The builder was careful here when applying the heat and only a very slight distortion ultimately occurred on the inside of the seat tube which was easily removed by a reaming tool (no distortion was noticeable to the outside of the frame.
This made me think . I always wondered why Cino Cinelli used a 26.2 seat pin instead of the 27 or 27.2 diameters as other contemporary frame builders did at the time. I maybe very wrong in my assumption on this but after looking at the Cinelli rebuild undertaken by Campyonly, I noticed that the seat lug on their original frame appeared to be sleeved to reduce it’s internal diameter (the join can be easily seen as it was not filled in). Is it possible that to prevent heat distortion to the seat lug when building his frames in Milan, that Cinelli fitted this reducing collar inside the seat lug so as to give it extra support and to act as a “heat sink”thereby avoiding distortion during construction? Perhaps there are other reasons why he used 26.2 over 27 or 27.2 seat posts and I will be put to rights by other more informed Cinelli owners/followers of the Marque.
Picture 10 shows construction as of Spring 2010.
Picture 12: Throughout the winter of 2009/2010 no further brazing work was done owing to the very low temperatures and the rapid cooling affect that would make the joints too brittle and liable to snap. Instead my friend started working on the turning of a set of top eyes for the stays.
Again, as we did not have a frame to take measurements from this was done entirely through visual reckoning . The steel needed to turn these top eyes was only a form of bright mild steel alloyed with a small percentage of lead. The presence of lead allows the whole eye piece to be turned out smoothly. These top eyes were turned down at their lower end to produce a short shank that would then fit inside the seat stay tube. It did not need to be particularly long as silver braze penetration would not be that deep here. The chain stays were brazed into place first followed by the seat stays so as to get the correct top eye height/ position in relation to the seat lug window. This was crucial owing to the way in which the seat binder bolt interacts with the seat post to provide a slip free clamping arrangement."
To be continued in Part II.....
I invite you to contribute by sending in photographs of your Cinelli bike, illustrations, personal stories, and articles about Cinelli bikes and components.
Thanks for stopping by.
I can be contacted at veronaman@gmail
No comments:
Post a Comment